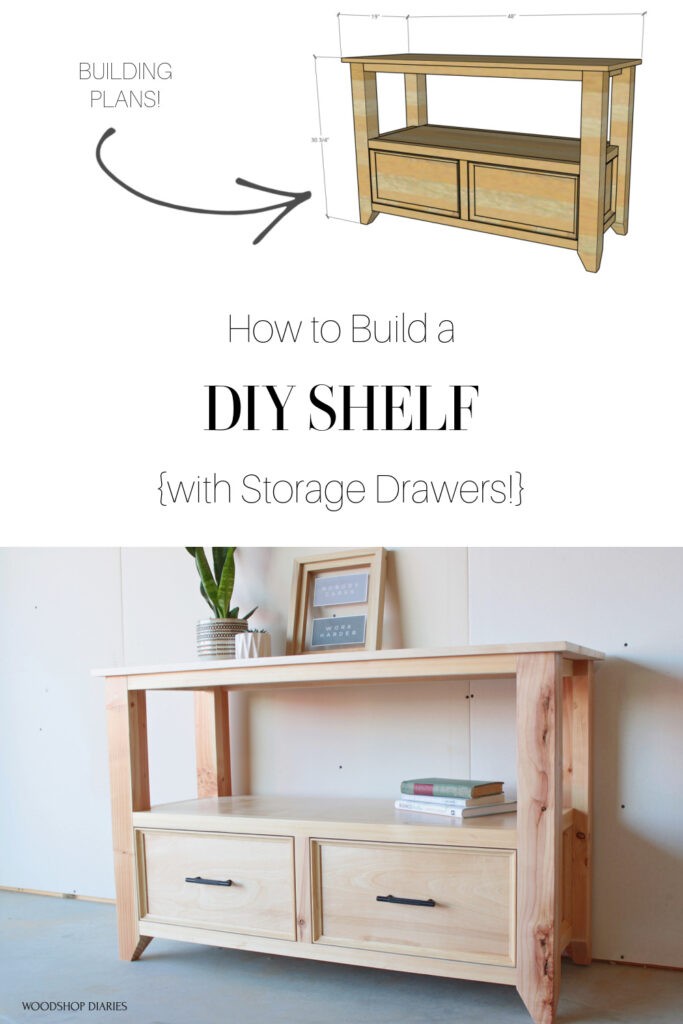
Diy Drawer Glide Book Shelf
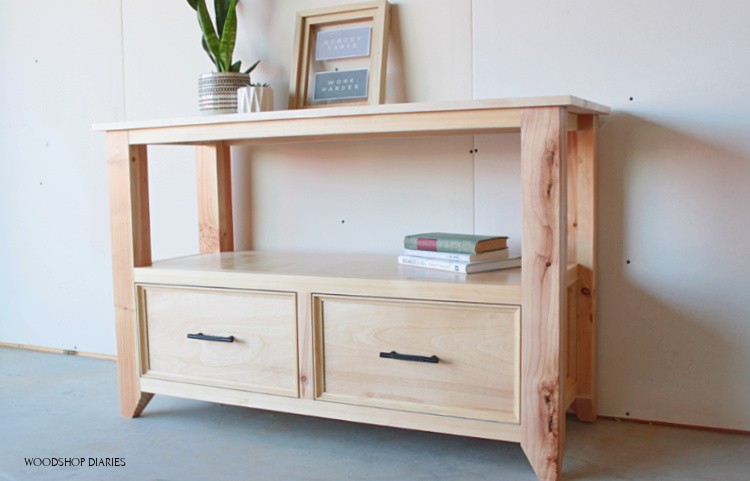
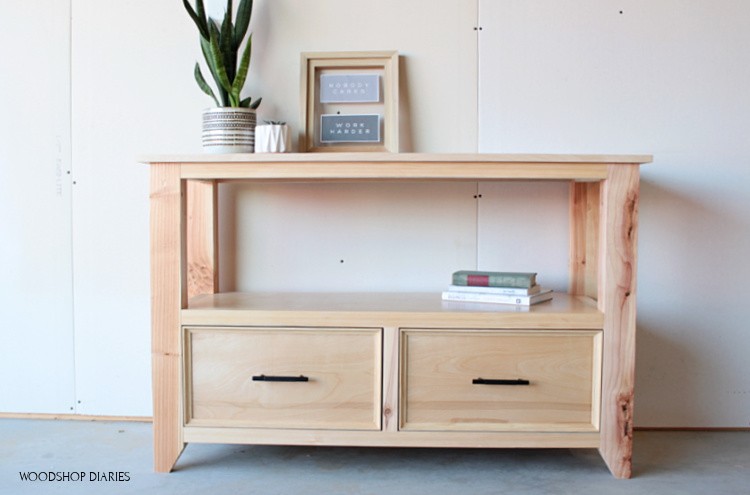
Check out this DIY Shelf {with drawers!} made from basic 2x4s and plywood!
I recently shared how to build a large work desk using 2x4s and plywood. I actually made that desk for my dad's office space and today, I'm sharing this matching DIY shelf with drawers that will be going in his office as well.
.
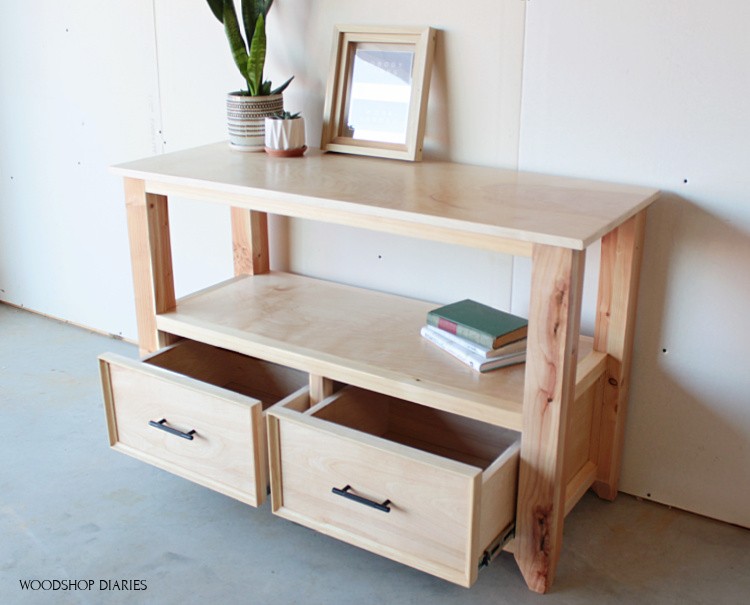
Now, this design isn't your typical DIY bookshelf. With two deep drawers at the bottom, it's almost like a dresser combined with a bookshelf and made this handy piece that's great for both storage and display.
.
My dad will be using it in his office to store and display product samples for his customers. But this would also work well just about anywhere else you'd like to add some extra storage or open shelving.
.
I'm sharing the video tutorial here and the plans to build your own below!
This post contains affiliate links. See policies .
I kept this build easy and inexpensive by using birch plywood and basic 2x4s from The Home Depot. But, obviously, you can use any wood type you wish for this project if you're building it yourself.
For this DIY Shelf with Drawers, You Will Need:
- (3) 2x4x8 boards
- (4) 2x2x8 boards (or just add two more 2x4s and make your own 2x2s from that)
- (1) sheet ¾″ plywood (I used birch)
- ½ sheet ¼″ plywood
- (3) 8 ft sticks cove molding (optional)
- (2) pair 16″ ball bearing drawer slides
- Circular saw
- Miter Saw
- Drill
- Pocket hole jig
- Table saw (optional)
- 2 ½″ pocket hole screws
- 1 ¼″ pocket hole screws
- 2″ wood screws
- Wood Glue
- Edge Banding
The free plans are found in the blog post below, but printable plans are also available or purchase here:
Step 1: Assemble DIY Shelf Legs
I started this project out just like the matching writing desk—by gluing up 2x4s to make the leg posts.
.
To glue up the legs, I trimmed down my 2x4s to roughly 32" long pieces and glued and clamped four sets of 2 together to make four leg posts.
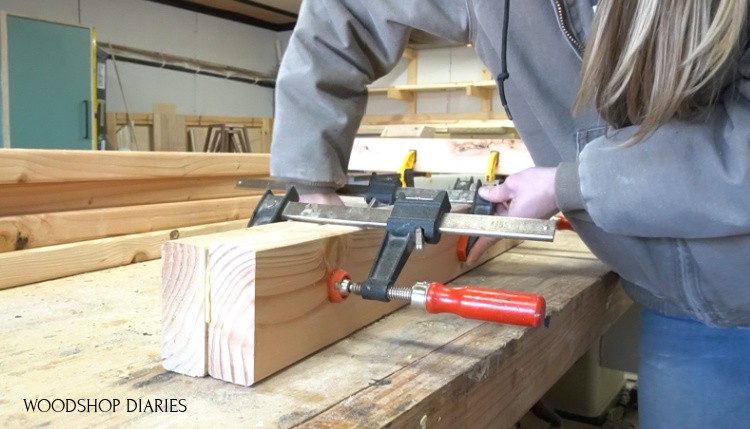
Once the glue dried, I took them to the table saw to clean up the edges and trim them down to a square 3" x 3" post. Since 2x4s are about 1 ½" thick and 3 ½" wide, I had to remove about ½" from the width to match the thickness of 3".
.
NOTE: if you don't have a table saw, you can simply sand the edges clean and leave the posts as 3′ x 3 ½″. Just note that if you leave the width 3 ½″, make sure to assemble the frame with the legs oriented so the wider side is on the WIDTH of the piece and not the depth.
.
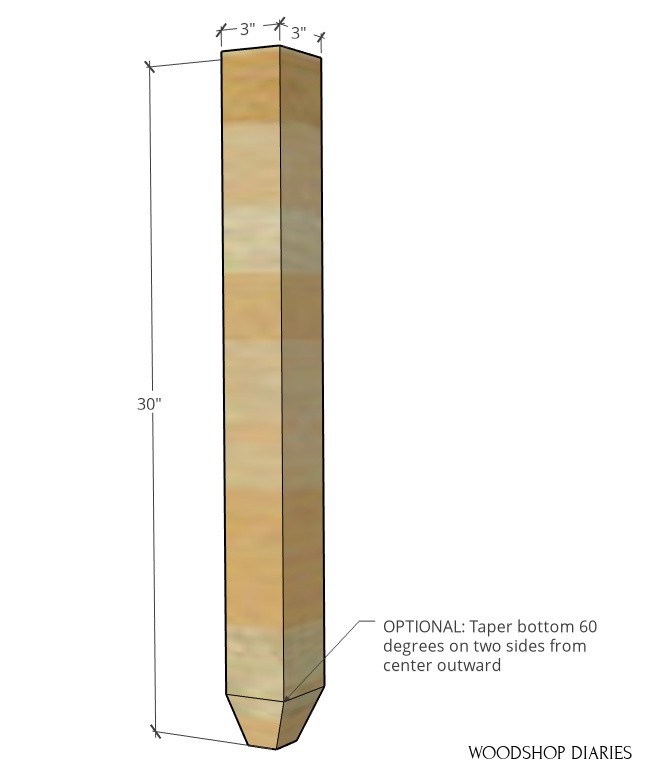
Once the posts were 3" square, I took them to the miter saw to trim them to 30" long.
.
Now, just like with the matching desk from previously, I tapered the ends of these leg posts for some extra detail. This is a totally optional step, but to do this, I adjusted my miter saw angle to 60 degrees and cut two adjacent sides from the center at the bottom out to the edge.
Once the legs were trimmed and tapered, I could move on to the fun stuff—assembly.
Step 2: Assemble Shelf Side Panels
The main frame of this project was built with 2x2s. You could obviously purchase precut 2x2s at the lumber yard, but I like to cut my own from 2x4s as this provides me with cleaner corners.
.
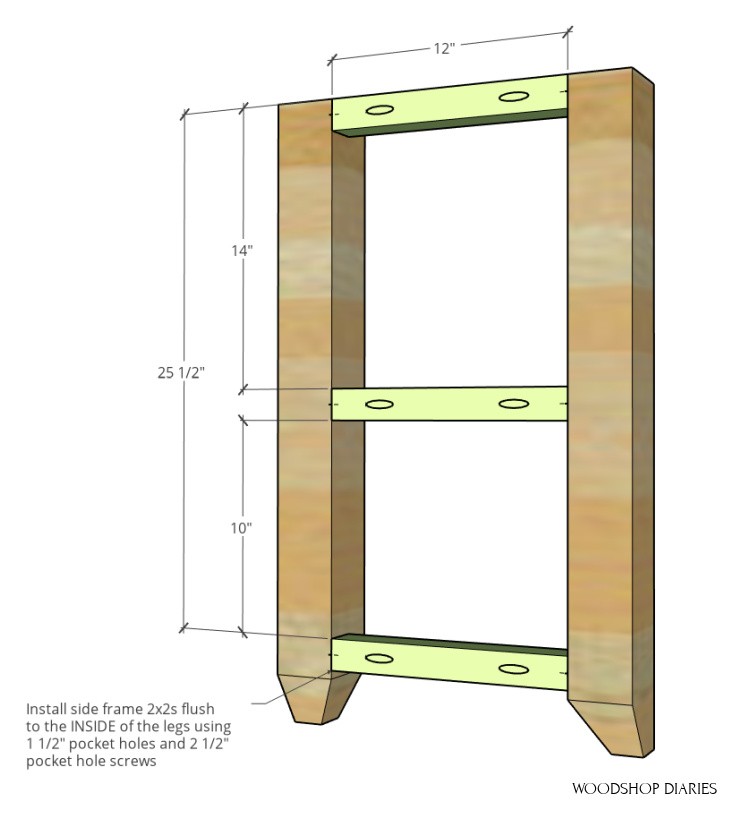
Either way, I just cut six pieces of 2×2 to build two identical side frames like shown below. I assembled the pieces using 1 ½″ pocket holes and 2 ½″ pocket hole screws.
.
Notice that the 2x2s are attached so they are flush across the INSIDE of the legs and the tapers face the inside corners.
Now, the beauty of doing it yourself is that you can pick your own preferred method of joinery for your project. If you don't like pocket holes, feel free to use whatever method you do like.
.
I used a little wood glue at each pocket hole joint as well. I find that using 2 pocket holes in a 2×2 will usually cause the wood to split, so I like to use wood glue with just one pocket hole screw with my 2x2s. That's just me.
.
Now since the bottom of this piece is drawers, I wanted to install a solid panel at the bottom of both side frames. I cut two pieces of ¾″ plywood for this and installed then into the side frames using ¾″ pocket holes and 1 ¼″ pocket hole screws.
RELATED: Check out this post for more information on cutting plywood!
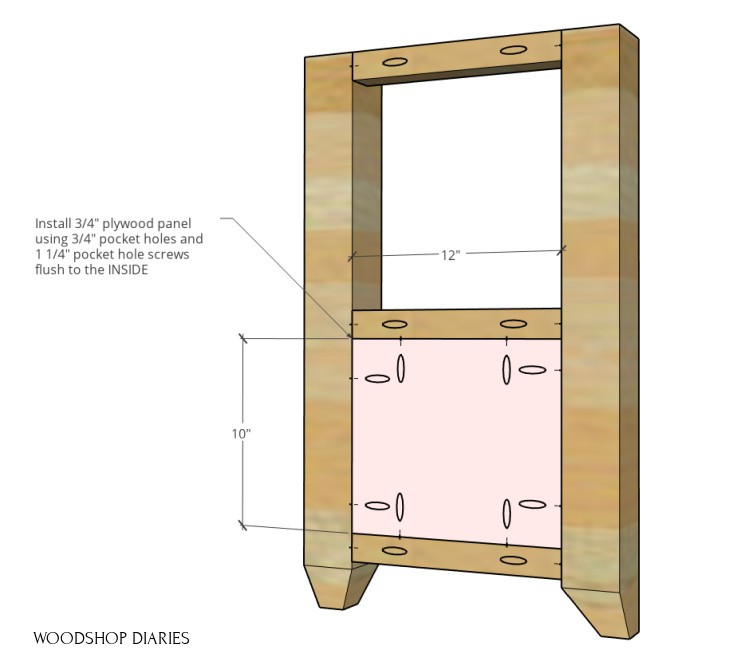
Notice that this panel is attached so it's flush across the INSIDE of the legs and frame.
Step 3: Assemble Middle Shelf Panel
Once the two side panels were assembled, I was ready to build the rest of the frame, but first, I decided to attach the middle plywood panel between the two middle supports.
.
I cut a piece of ¾″ plywood to use as the middle shelf panel (15″ x 40″ shown in green below), and cut six 2x2s to 40″ to use as the front and back frame pieces.
RELATED: Check out this post for more information on cutting plywood!
.
To make things easier, I preassembled this middle shelf by screwing the panel into two of the 2x2s like shown here using ¾″ pocket holes and 1 ¼″ pocket hole screws.
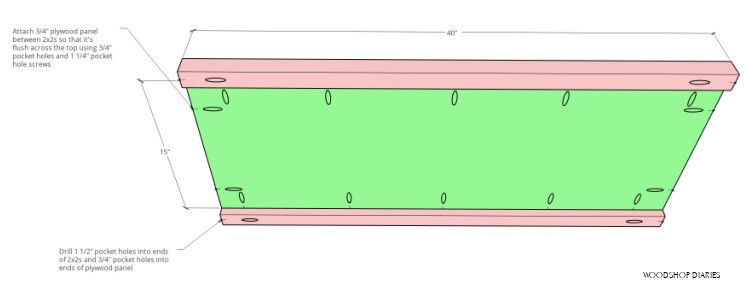
I attached the shelf so that it was flush across the top of the 2x2s and used a clamp to help hold the pieces together while I drove the screws.
.
Notice that I also predrilled the pocket holes into the ends (use ¾″ pocket holes on the plywood and 1 ½″ pocket holes on the 2x2s) to install in step 4.
Step 4: Assemble DIY Shelf Frame
I attached the middle shelf in place so that it was even with the side pieces and screwed the other 2x2s in—two at the top and two at the bottom.
.
Keep in mind that for the 2x2s, you will use 1 ½″ pocket holes with 2 ½″ pocket hole screws and with the ¾″ plywood, you will use ¾″ pocket holes with 1 ¼″ pocket hole screws.
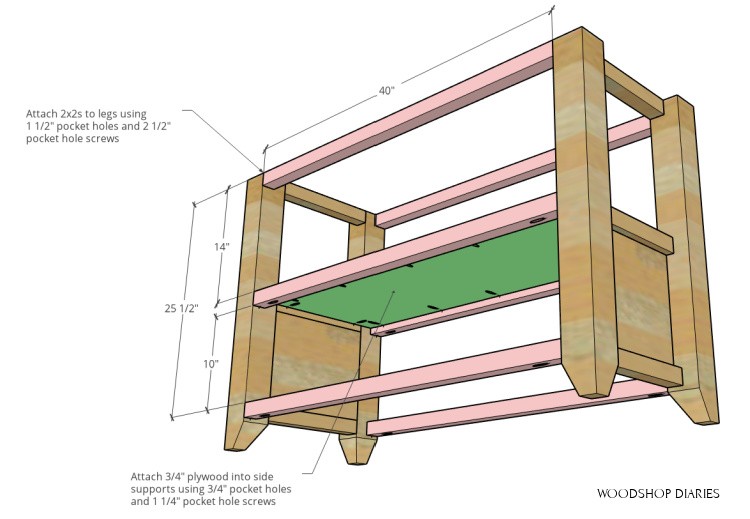
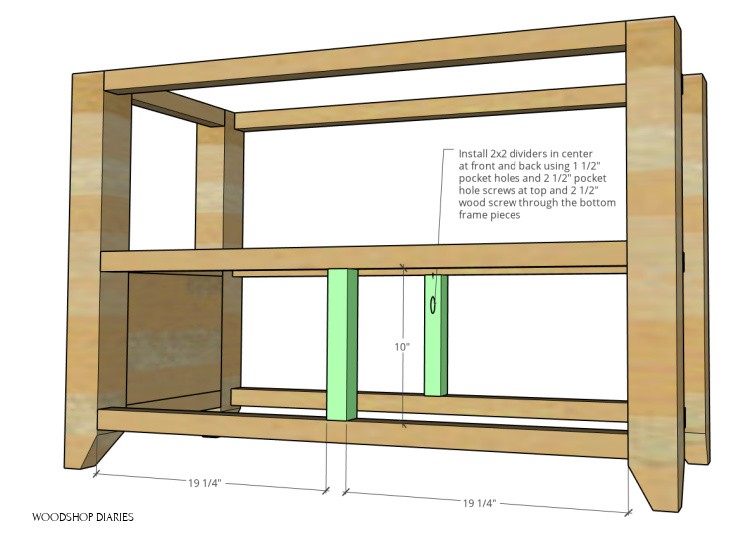
Then, I added some 2×2 pieces in the middle at the bottom to separate the two drawers.
.
Since these pieces were small, I couldn't get in to drive a pocket hole screw at the bottom, so I just did one at the top and used a wood screw to attach these divider pieces at the bottom.
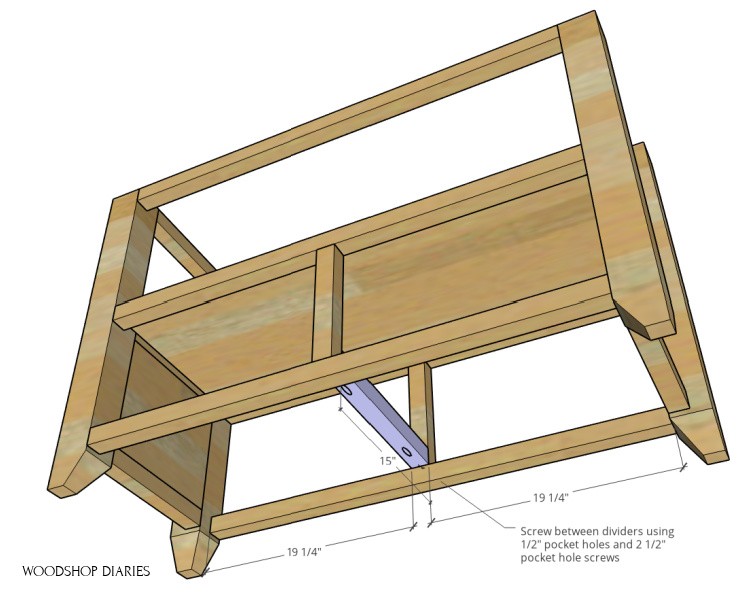
Then, I screwed a 2×2 in between them to give me somewhere to mount the drawer slides.
Step 5: Attach Top to DIY Shelf with Drawers
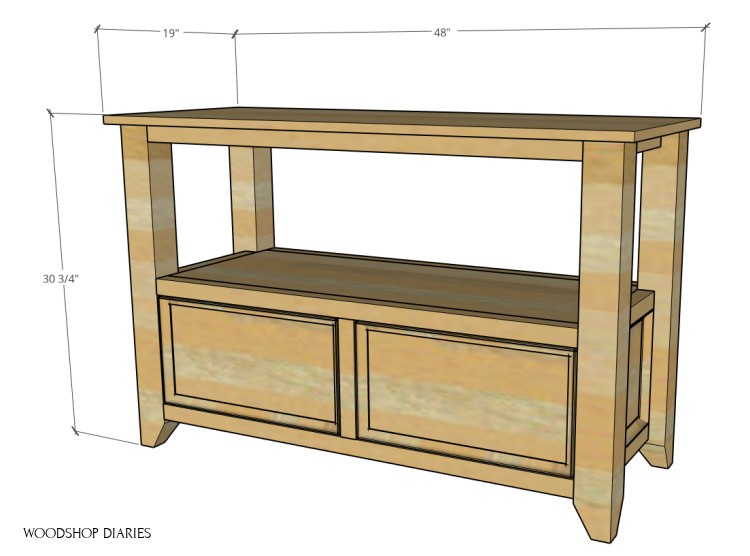
I cut a piece of ¾″ plywood for the top to 19″ x 48″.
.
I applied iron on edge banding to the sides of the top to clean up the edges a little before and gave it a good sanding before attaching.
RELATED: Check out this post for how to apply iron on edge banding to your plywood!
.
Once the top was sanded, I attached it onto the base. I made sure to leave 1" overhang on the front edge and 1" overhang on each side and screwed in place using 2" wood screws through the top 2x2s.
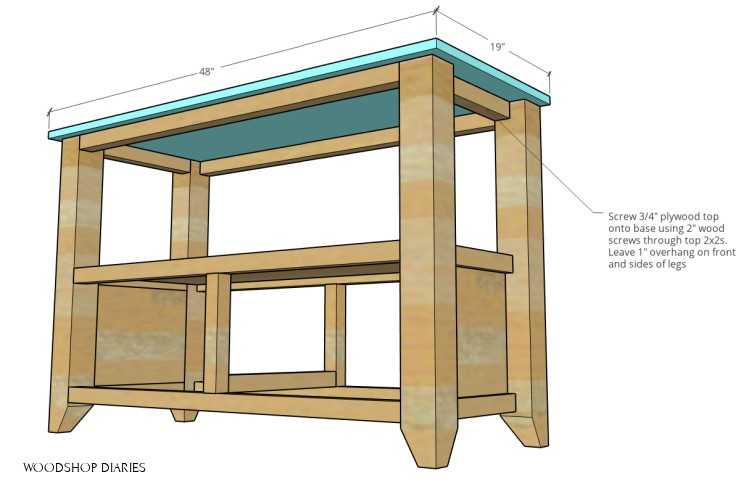
NOTE: If you left your legs 3 ½″ wide in step 1, you will leave only ½″ overhang on the sides…not 1″. Or you can cut your top 49″ long and leave the full 1″.
Step 6: Build and Install Drawers
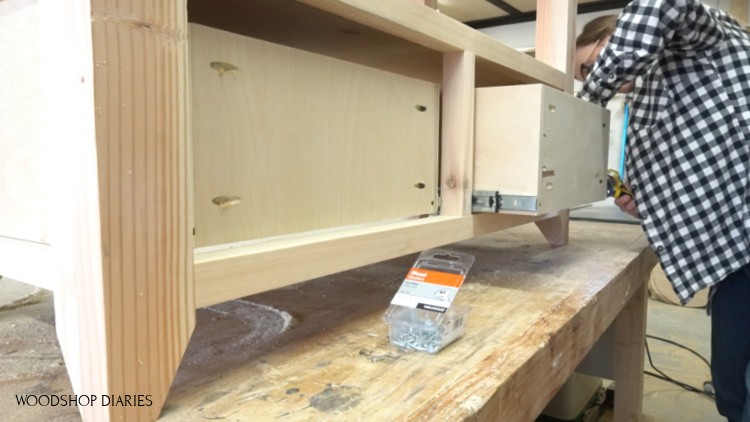
I used two pair of 16" ball bearing drawer slides and installed them into the shelf 1 ½" inset from the front edge.
RELATED: For more information on installing drawer slides, check out this helpful post!
.
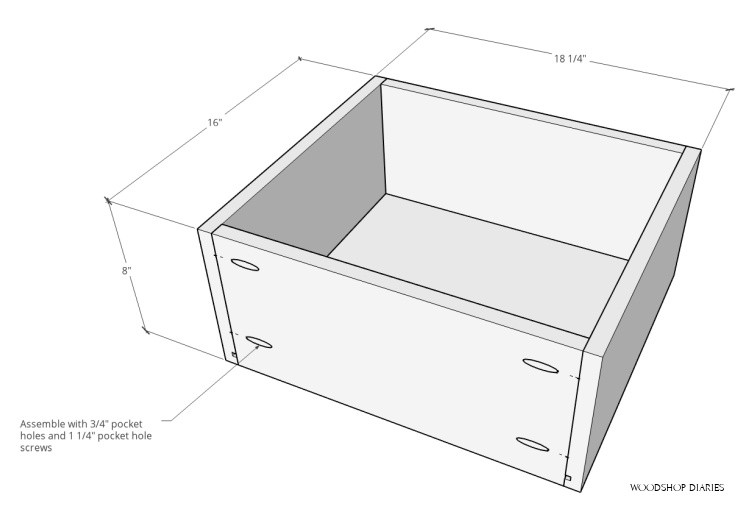
After the slides were installed, I cut ¾″ plywood pieces for the drawer boxes and some ¼″ plywood pieces for the drawer bottoms like shown here.
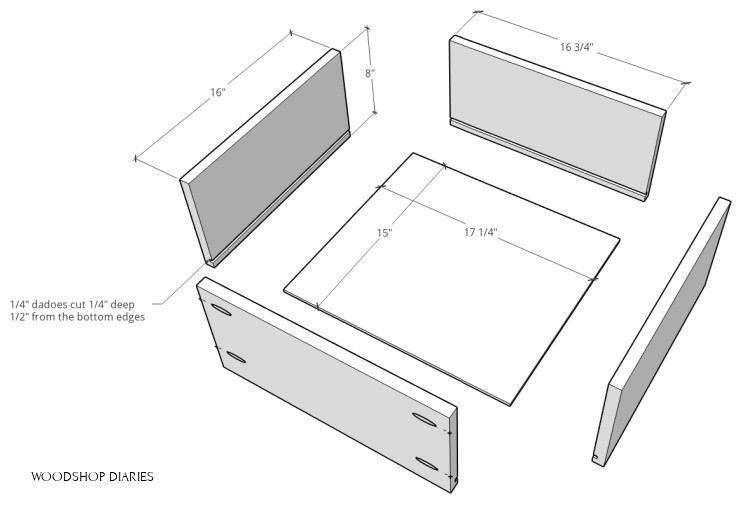
I cut ¼″ dadoes ¼″ deep ½″ from the bottom edge of the drawer box sides to install the drawer bottom. However, you don't have to cut dadoes if you don't want. You can simply glue and staple or screw the plywood bottom in place.
.
RELATED: For more information on building drawers, check out this ULTIMATE DRAWER BUILDING GUIDE post.
.
I edge banded the drawer box tops—which is an optional step, but looks really nice so I think it's worth doing.
RELATED: Check out these five tips for more professional looking DIY furntiure!
.
Then I assembled the drawer boxes using ¾″ pocket holes and 1 ¼″ pocket hole screws.
Then, I installed the drawer boxes into the shelf.
Step 7: Build and Install Drawer Fronts to Shelf Drawers
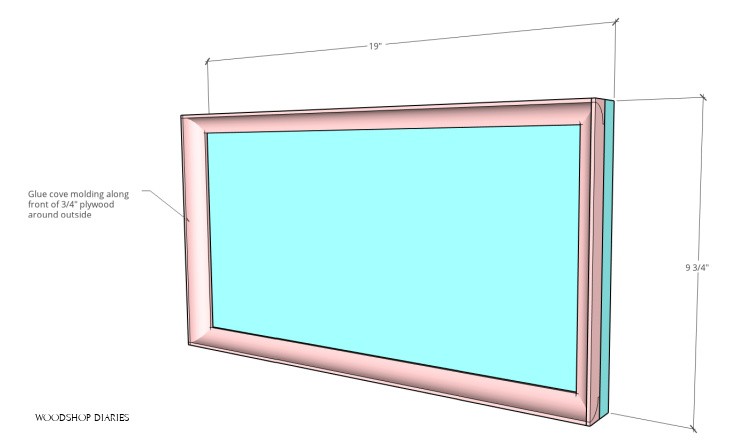
Just like with the matching desk from my previous post, I added some trim on the drawer fronts. So once the ¾″ plywood drawer fronts were cut to size (9 ¾″ x 19″ shown in blue below), I cut to fit cove molding to frame out the front edges.
I just used a little wood glue on the molding and painters tape to hold the pieces in place until it dried. Once the glue dried, I removed the tape.
.
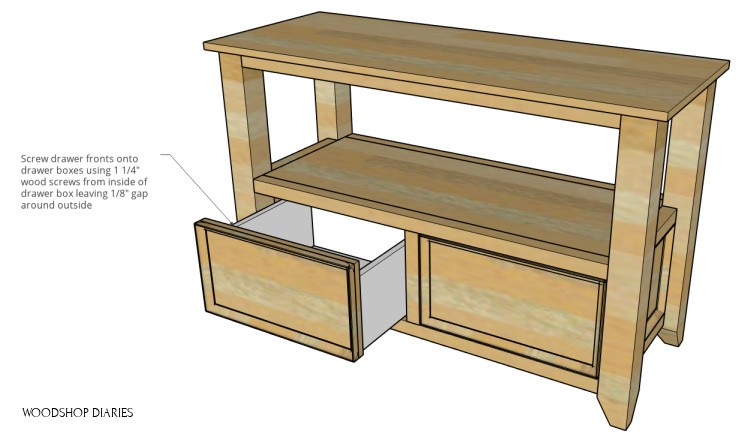
Then, I installed the drawer fronts onto the drawer boxes using 1 ¼″ wood screws from the inside of the drawer boxes leaving ⅛″ gap around all sides.
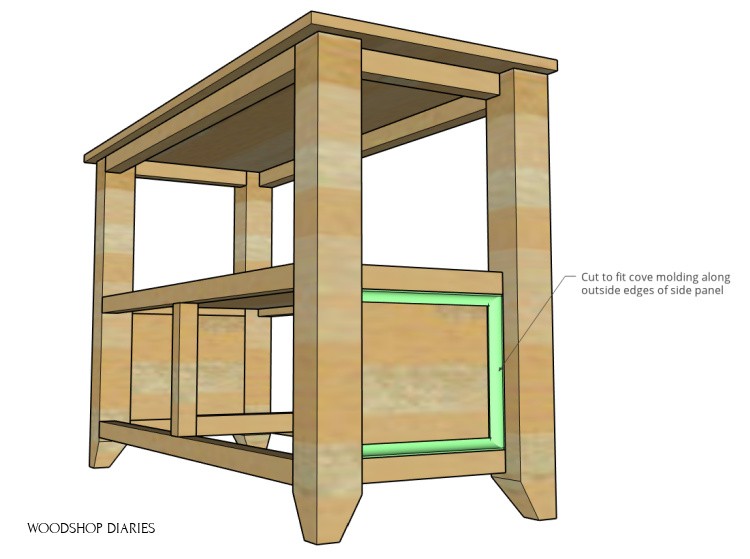
Step 8: Add Trim on Sides (OPTIONAL) & Finish
I also added some cove molding around the side panels—I just glued these to avoid the nail holes, but you could also brad nail these pieces if you wanted.
Again, just like the matching desk, I simply gave this project a clear coat of Minwax Helmsman Water Based Poly to keep its natural color, then added some simple black handles to the drawers.
Now it's ready to be put to good use.
.
I'm loving the option for both storage and display in this finished DIY bookshelf. It's going to be perfect for my Dad's office.
.
If you're interested in all the matching pieces from his office builds, I built him filing cabinets a while back, a new work table, now, this storage shelf, and a new computer desk is currently in the works (stay tuned!).
So if you've enjoyed the past projects (and this one too!), be sure to subscribe to my newsletter below so you don't miss the upcoming posts!
.
And if you'd like to save this for later, don't forget to pin it!
Until next time, friends, happy building 😊
Source: https://www.woodshopdiaries.com/diy-shelf-with-drawers-using-2x4s-and-plywood/
0 Response to "Diy Drawer Glide Book Shelf"
Post a Comment